
Shopify's blog editor is fine for words and poor for photos. Every image is inserted one at a time, lands at full column width, has no lightbox and cannot be filtered or reordered without dragging. Event recaps, behind-the-scenes posts, customer round-ups and travel diaries all suffer from it. This guide shows how to put a proper gallery inside a blog post without touching theme code: you create an alternate template for blog posts, add the Snug Gallery app block to it, and assign that template to the post. It also explains the one limitation of the approach, so you can decide whether a gallery page linked from the post is the better fit.
Why the blog editor is the wrong tool for a set of photos
The article editor stores your post as HTML. An image you insert becomes an <img> tag in that HTML, served from your store's Files, stacked above or below the paragraph you were typing in. That is right for one illustrative photo. It is wrong for forty photos from a market stall weekend: the post becomes a very long scroll, readers cannot open a photo larger, and there is no way to show the set as a grid or masonry without writing HTML and CSS by hand in the editor's code view, which the editor is known to rewrite.
A theme section does this better because the theme controls layout and loading. Online Store 2.0 themes build blog post pages from a JSON template (article.json) made of sections, and sections can include app blocks, which is how Snug Gallery renders. The question is how to get a gallery section onto one blog post without putting it on every blog post. The answer is an alternate template.
What you need
An Online Store 2.0 theme (Dawn, Sense, Craft, Refresh and almost every paid theme released since 2021). You can tell because the theme editor offers an Apps category when you click Add section. Themes with the Canvas badge cannot take app blocks yet; see Shopify Canvas and Snug Gallery for the current state.
A gallery already created in Snug Gallery. If you have not made one yet, the five-minute walkthrough is in How to add a photo gallery to a Shopify store (no code). The free plan allows one gallery of up to 25 images, which covers most single-post photo sets.
The blog post itself, published or in draft. Everything below works the same way for a post that is not yet live, which is the sensible order: build the template first, then publish.
Step by step
- In the Shopify admin go to Online Store, then Themes, and click Customize on the theme you want to change. If you would rather not touch the live theme, use Duplicate first and customize the copy.
- At the top of the theme editor, open the template dropdown (it usually reads Home page) and choose Blog posts. You now see the default blog post template with a sample article.
- Open the same dropdown again and click Create template. Give it a name that describes its use, such as photo-gallery, and base it on the Default blog post. Shopify saves it as article.photo-gallery.json. Shopify's theme templates page describes alternate templates and the naming rule.
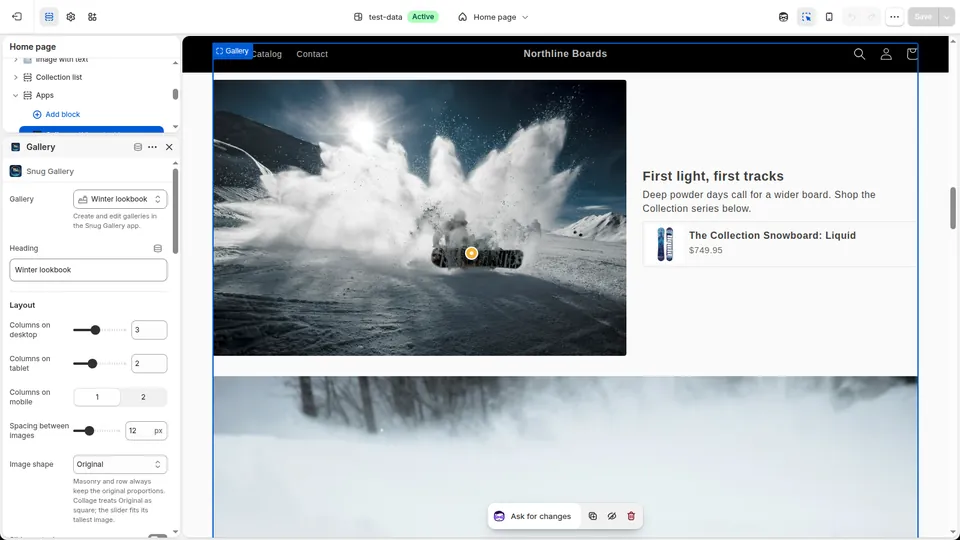
- In the left sidebar, below the blog post section, click Add section and open the Apps category. Pick Snug Gallery. The block appears as its own section, which you can drag above or below the article body. Below the text is usually right; the heading and first paragraph then stay the largest element on the page, which matters for Core Web Vitals, as explained in Gallery page speed and lazy loading.
- Click the block and use the Gallery picker to choose the gallery you created in the app. Add an optional heading, then Save. Shopify's documentation on sections and blocks covers the editor controls if anything looks unfamiliar.
- Leave the theme editor and open the blog post under Online Store, Blog posts. In the right-hand column find Theme template (sometimes labelled Online store, Theme template) and switch it from Default to photo-gallery. Save the post.
- View the post on the storefront. The gallery renders under the article in the layout you chose, with the lightbox, captions and tag filters that gallery already has. No code was changed, and removing the gallery later is a matter of switching the post back to the Default template.
The limitation: templates are per template, not per post
The gallery you select in the block is a setting on the template, so every post assigned to article.photo-gallery.json shows the same gallery. If you write one photo-heavy post a quarter, that is no problem: create one template per gallery post, or reuse the template and swap the gallery each time you publish, accepting that the older post then shows the new set. If you publish photo posts every week, you will not want a template per post.
There are two better arrangements for frequent photo posts. The first is one gallery with a tag per post. Tag the photos from each event, keep the block set to that one gallery with filters on, and link from each post to the pre-filtered view so a reader lands on only that event's photos. The URL pattern for that is described in Link to a filtered Shopify gallery. The second is a dedicated gallery page (for example /pages/photos) that every post links to with a short line such as "See all 60 photos from the weekend". Both keep the blog on the default template and keep the number of templates at one.
Whichever you choose, the photos are uploaded once. Snug Gallery stores media in your store's Files and renders from Shopify's CDN, so a photo used in a gallery can also be inserted inline in the article from the same Files library without a second upload.
Making the post do SEO work
A blog post with a gallery under it is a strong page for image search: it has descriptive text, a date, a title, and a set of images with alt text on the same URL. Write the alt text in the gallery editor as you would describe the photo to someone on the phone, and keep the post's text about the same subject. The guide on getting gallery images into Google Image Search covers alt text, file names and what Google can and cannot see.
Resist the urge to put the gallery above the article. Search engines and readers both prefer the text first; a thumbnail grid at the top pushes the first paragraph down and competes with the heading for the largest-contentful-paint slot. If you want a visual lead, insert one photo inline through the editor and let the gallery carry the rest at the bottom.
Checklist before you publish
Open the post in a private browsing window to make sure the template is assigned and the gallery shows for a logged-out visitor. Check it on a phone: a masonry layout with large images may want fewer columns on small screens, which is a setting on the gallery, not the template. Confirm the lightbox opens and the close button works with the keyboard. Then check your other blog posts still use the Default template, so the gallery did not appear where it should not.
If anything about the gallery rendering looks wrong, the block renders entirely from Shopify's CDN and your store's metaobjects; nothing is fetched from our servers on the storefront. Changes you make in the Snug Gallery editor show up on the post on the next page load, with no theme republish needed.
Frequently asked questions
Can I add a gallery to only one blog post?
Yes. Create an alternate blog post template in the theme editor, add the Snug Gallery block to it, and assign that template to the one post from the post's Theme template dropdown. Other posts keep the Default template and are unaffected.
Do I need to edit theme code to put a gallery in a blog post?
No. Alternate templates are created from the theme editor's template dropdown, and the gallery is an app block added from the Apps category. Switching a post back to the Default template removes the gallery with nothing left in the theme files.
Can each blog post show a different gallery?
Only with a separate template per post, because the chosen gallery is a setting on the template. For frequent photo posts, use one gallery with a tag per post and link to the filtered view, or a single gallery page that every post links to.
Will the gallery images count as part of my blog post for Google?
They are on the same URL as the post, with their alt text, so Google can associate them with the post's title and text. Descriptive alt text and a post about the same subject are what make image search results from that page likely.
Does the blog post gallery work on Canvas themes?
Not yet. Themes with the Canvas badge do not currently accept app blocks. Use the theme without the badge, or a copy made with Duplicate rather than Duplicate in Canvas, and the steps above work as described.
More guides
- How to add a photo gallery to a Shopify store (no code)
- How to make a shoppable lookbook on Shopify
- Shopify gallery not loading? Why gallery apps vanish
- Cozy Image Gallery alternative: a 20-minute migration
- Who owns your gallery images? Shopify Files vs app-hosted
- Shopify app still charging after uninstall? What to do
- How to tell if a Shopify app is abandoned: a checklist
- Masonry, grid, carousel or collage: Shopify gallery layouts
- Accessible Shopify image gallery: an EAA-era checklist
- Instagram feed broken on Shopify? Own your customer photos
- Shopify video gallery: upload, YouTube or Vimeo?
- Protecting gallery images on Shopify: right-click blocking
- Does a photo gallery slow down your Shopify store?
- Shopify gallery images in Google Images: an SEO guide
- Shopify Canvas and Snug Gallery: what works today
- Build a Shopify gift guide page that is not a collection
- Replaced an image in Shopify but the old one still shows?
- Build a portfolio page on Shopify that still sells
- Link to a pre-filtered Shopify gallery from menus and emails
- Lifestyle photos on a product page: media or gallery block?
- Clickable gallery images on Shopify: link to collections
- Shopify Rollouts: launch a sale theme, discount and gallery