
Merchants searching for a Cozy Image Gallery alternative usually arrive in a hurry: a gallery has stopped rendering, or support has gone quiet, and the store needs its photos back on the page this week. This guide is a practical replacement plan. It covers getting your images out safely, rebuilding each gallery in Snug Gallery with the closest layout, placing it in the theme editor, and cleaning up the old app without being billed twice. It takes about twenty minutes per gallery once your images are in hand, and everything you build stays inside your own Shopify store.
Where things stand with Cozy Image Gallery
Cozy Image Gallery is still listed on the Shopify App Store and had a 3.1-star rating when we checked on 28 September 2026. It has not been delisted. What you can read on its one- and two-star review page is a cluster of reviews from August to October 2025 describing galleries that stopped loading and support that did not answer. Two short fragments, with their dates: “Galleries have crashed for over a week and no response from support” (21 August 2025) and “App not working for weeks, no notice given and no response to emails” (9 September 2025). Several reviewers on that page say they have moved to other apps. We link to the page so you can read the full reviews and the developer's replies yourself rather than take our summary for it.
If your gallery is currently blank, Why a Shopify gallery can disappear overnight explains what is going on technically and how to hide the broken block while you migrate. The rest of this guide assumes you have decided to move.
Before you start: get your images out
Everything else can be rebuilt in minutes; the photos cannot. Do this part before you uninstall anything. Shopify's Help Center is blunt about the order of operations: “some apps store data that you can't recover after uninstalling. Export any data you need before you remove the app” (Uninstalling apps).
- Check your own Files first. In the Shopify admin go to Content, then Files, and search for the file names or the month you built the gallery. If the old app uploaded your photos into your store, they are already yours; the Help Center describes a download button in each file's preview window that saves the original, unoptimised file (Uploading and managing files).
- If the photos are not in Files, find your originals: the camera export, the designer's folder, the Dropbox share. Most stores have them somewhere, and originals are better than anything you can pull back from a resized web image.
- If neither exists and the old gallery still renders, save the images from the live page now. Open the page, right-click each image and choose Save image as, or use the browser's Network tab filtered to images to grab the largest version that was served. This is a last resort and quality depends on what the app served.
- Write down, per gallery, the things you will want to reproduce: the page it appears on, the layout (grid, masonry, carousel), the image order, captions and any links. A phone photo of the old page is enough as a reference.
Step 1: install Snug Gallery and create the first gallery
Install Snug Gallery from the Shopify App Store. The free plan includes one gallery of up to 25 images with every layout and the lightbox, which is enough to rebuild one gallery and check it on your storefront before paying anything. Standard covers ten galleries of up to 1,000 images each and adds import from Files and products; Unlimited removes the gallery cap. Current prices are on the listing.
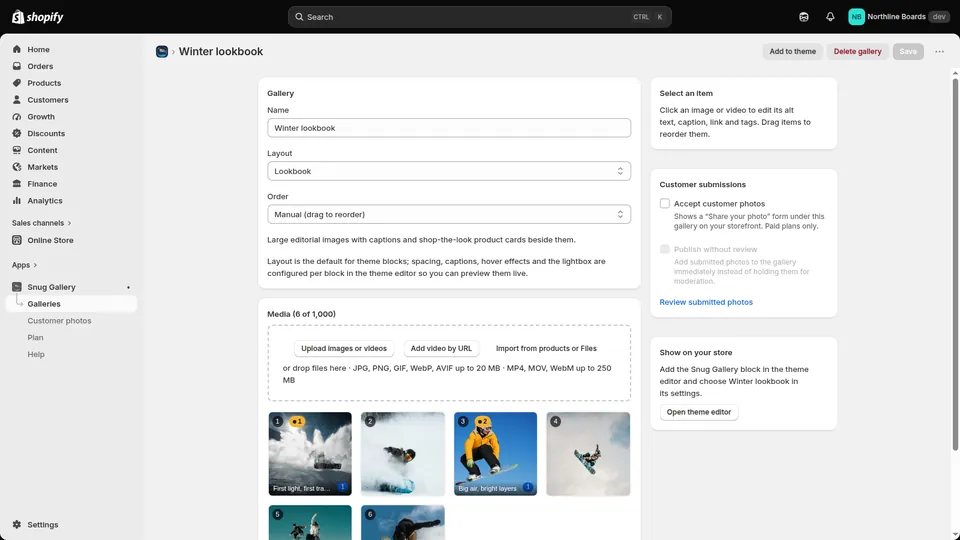
- In the app, click Create gallery, give it the same name as the old one and pick a layout. Snug ships nine: masonry, grid, carousel, slider, row, list, collage, portfolio and lookbook. A Cozy grid maps to Grid, a masonry wall to Masonry, and a scrolling strip to Carousel or Slider; Masonry, grid, carousel or collage explains the differences if you want to reconsider.
- Drag your photos into the Media area, or click Upload images or videos. JPG, PNG, GIF, WebP and AVIF are accepted. On the Standard plan or above you can instead click Import from products or Files and pick the photos that are already in your store, which skips the download step entirely.
- Set Order to Manual and drag the thumbnails into the order of the old gallery. Click any image to add its alt text, caption, link and tags in the side panel. Tags power the optional filter bar on the storefront.
- Click Save. Nothing is on your storefront yet; the gallery is stored as metaobjects in your store and waits for a block to display it.
Step 2: place the block in the theme editor
Snug Gallery is a theme app extension, so it appears in the theme editor as an app block rather than as code you paste. Shopify's documentation describes the model: merchants add and configure app blocks from the theme editor and do not need to edit theme code (Theme app extensions).
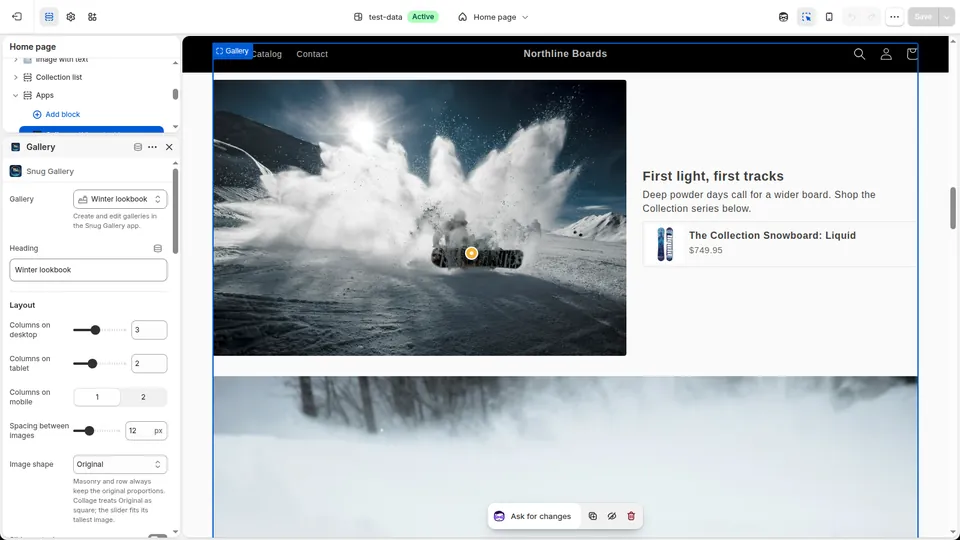
- In the gallery editor click Add to theme. This opens your live theme in the theme editor with a Gallery block already added to a new Apps section on the home page template. If you want it on a different page, use the page selector at the top of the editor, open the section where the old gallery lived, click Add block and choose Gallery under Apps.
- In the block settings choose the gallery you just created. Set columns for desktop, tablet and mobile, spacing, image shape, caption style, hover effect and whether the lightbox opens; these settings are per block, so the same gallery can look different on two pages.
- Drag the block to the position the old gallery occupied, then click Save. The gallery is live immediately.
- Open the page in a private browsing window and on your phone. Check the order, captions and the lightbox. Repeat Step 1 and Step 2 for each remaining gallery.
Step 3: remove the old app without leaving code or charges behind
- Hide or delete the old gallery's section or block in the theme editor so the page does not show two galleries or one broken one.
- Search your theme code for leftovers. In Online Store, Themes, Edit code, use the search box for the old app's name or domain and remove any snippet it added to theme.liquid or a template. Shopify's uninstall page warns that “some apps add code to your online store theme that isn't automatically removed when you uninstall the app”. Duplicate the theme first if you are not comfortable editing it.
- Sort out billing before you uninstall. The Help Center states that uninstalling a paid app “cancels future recurring charges, but you might still be billed for the current billing cycle”, and that you should contact the developer about a refund before uninstalling. If the app charged you outside Shopify, uninstalling does not cancel that; you have to cancel it with the developer (Uninstalling apps). More on this in Why some Shopify apps keep charging after uninstall.
- Then go to Settings, Apps and sales channels, and uninstall. Keep your downloaded originals until the new galleries have been live for a while.
What is different after the move
The main change is where the gallery lives. In Snug Gallery every photo is uploaded to your store's Files and served from Shopify's CDN, the gallery itself is saved as metaobjects in your store, and the block's assets are on Shopify's CDN as part of the theme app extension. Rendering a gallery never calls our servers, so the failure mode described in the reviews above, a developer-side certificate or server taking every store's galleries down at once, does not apply. If you later leave Snug Gallery, your images are still in Files; the details are in Who owns your gallery images?.
Billing is through Shopify App Pricing, so the plan appears on your Shopify bill, is upgraded or downgraded from the app's Plan page, and ends when you uninstall, with no separate subscription to chase. Support is by email from the developers who wrote the code, with a reply within two business days.
Frequently asked questions
Has Cozy Image Gallery been removed from the Shopify App Store?
No. As of 28 September 2026 it is still listed with a 3.1-star rating. The linked review page shows what merchants reported in 2025; it does not show a delisting, and we make no claim beyond what is on that page.
Can Snug Gallery import my galleries from Cozy automatically?
No. There is no importer for another app's galleries. If your photos are already in your store's Files, the Standard plan's Import from products or Files picks them up in a few clicks; otherwise upload your originals. Captions, order and links are re-entered in the editor.
Do I need to edit my theme code to use Snug Gallery?
No. The gallery is an app block added from the theme editor, and Add to theme in the editor opens the theme editor with the block placed for you. Removing it later is a matter of deleting the block; nothing is written into theme.liquid.
How many galleries can I rebuild on the free plan?
One gallery of up to 25 images, with every layout and the lightbox. If you have several galleries, rebuild the most important one on the free plan to check the result, then move to Standard (ten galleries, 1,000 images each) or Unlimited from the Plan page in the app.
Will my old gallery's images be deleted when I uninstall Cozy?
We cannot say what another app does on uninstall, which is why this guide has you secure the images first. Shopify's own guidance is to export any data you need before removing an app because some app data cannot be recovered afterwards.
More guides
- How to add a photo gallery to a Shopify store (no code)
- How to make a shoppable lookbook on Shopify
- Shopify gallery not loading? Why gallery apps vanish
- Who owns your gallery images? Shopify Files vs app-hosted
- Shopify app still charging after uninstall? What to do
- How to tell if a Shopify app is abandoned: a checklist
- Masonry, grid, carousel or collage: Shopify gallery layouts
- Accessible Shopify image gallery: an EAA-era checklist
- Instagram feed broken on Shopify? Own your customer photos
- Shopify video gallery: upload, YouTube or Vimeo?
- Protecting gallery images on Shopify: right-click blocking
- Does a photo gallery slow down your Shopify store?
- Shopify gallery images in Google Images: an SEO guide
- Shopify Canvas and Snug Gallery: what works today
- Build a Shopify gift guide page that is not a collection
- Replaced an image in Shopify but the old one still shows?